
Perfect your jam setting with our top tips for homemade jams, jellies and conserves. Our guide to the three main techniques will help you make a perfectly set jam every time!

Perfect Jam Setting Every Time!
I love preserving, from chutneys and pickles to jams and jellies, and find it a relaxing rewarding hobby, but for perfect preserves you need to learn how to get the perfect set every time.
Practice makes perfect! We are constantly preserving, and make 2 or 3 batches a month. That is a lot of preserves and a lot of practise in getting the perfect set every time.
It makes a big difference, but don’t worry if you’re not making as much as us. After a few goes, you’ll find the best method for you.
Start small! We are big fans of small batch preserving, making 2-4 jars at a time. It faster, gives you a chance to experiment, and the more batches you make the better your set will be.
Also, I don’t end up stuck in a hot kitchen for hours with a huge saucepan of boiling jam, trying to get it hot enough to set and boiling away the fresh fruit flavours.

What’s the difference between jam, jelly, conserve and preserve?
When I talk about jam in this post we are also referring to all sweet preserves – so all jams, jellies, and conserves; all of which are based on cooking fruit with sugar.
To me, a jam is a preserve that contains both pieces of fruit and the fruit juice, while a jelly is made using only fruit juice.
A conserve keeps the fruit whole. The latter are frequently made by steeping the raw fruit in sugar and allowing the juice to be drawn out before cooking gently, and then bringing up to a boil and setting.
What Makes Jam Set?
The secret ingredient that makes jam well, jammy, is pectin. This is a polysaccharide natural sugar found in fruit, particularly in peel, pips and cores.
- Read our in depth article on pectin and its role in jam setting point
Boiling the jam releases the pectin from the fruit. With the right amount of sugar and acid, the pectin molecules bind together into a gel, holding the water and so setting the jam. Without pectin, you would just have a thick, sweet liquid.
Sugar is needed for this chemical reaction; it absorbs some water, increasing the concentration of pectin molecules and making them more likely to bind together.
The technical bit
By binding water molecules to itself, it reduces the amount of water available in the jam, to the point at which it is too low for microbial growth, helping to ensure that the jam doesn’t go off too rapidly after it’s been made! The final sugar content of jam should be between 65-69%.
Acid is also needed to stop the pectin molecules ionizing and so again, making them more likely to bind together.
These three things – pectin, sugar and acid – have to be in balance to make a jam that will set.
The Perfect Set – Hard Set vs Soft Set
I prefer my jams and jellies not to be set too hard. I’m happier with a slightly runnier result than something that’s thick and less spreadable. I find commercial jams are set far too hard for me – one of the advantages of making my own.
A softer set is the result of taking the jam off the heat as soon as I think that it’s reached a setting point. If I keep the rolling boil going, the temperature of the jam continues to increase, and the jam gets
What fruits are high in pectin?
Fruits that are high in pectin, and so easier to set as jam or jellies include blackcurrants, crab apples, gooseberries, quinces, lemons and limes. Among medium pectin fruits are apricots, loganberries and medlars, and blackberries.
Low pectin fruits include figs, melons, nectarines and peaches, rhubarb, strawberries and raspberries. These will be more difficult, or impossible, to get a set with and you will need to add some pectin – homemade or lemon juice.

How to test for pectin?
There’s a simple way of showing if the cooked fruit contains high or low levels of pectin: you mix it with some methylated spirits in the ratio of 1:3 fruit to spirits. If there’s pectin present, it will form a blob. The more pectin, the more formed the blob will be.
How acidic does the mixture have to be?
The ideal pH is between 2.8 and 3.3. This is also easy to test: either with pH test strips, or with an electronic pH meter. They’re easily available online.
Fruits naturally contain acids – the most well known is citric acid, but malic acid and tartaric acid are also found in a number of fruits.Unripe fruit will lower the pH – the lower the number, the more acid. If your pH is too high, the easiest way to get the mixture acid enough is to add some lemon juice.
You can also add food grade citric acid.
How to add pectin to jam?
There are four main ways to add pectin to fruit to make for a easier setting jam.
First, use a mixture of fruit that includes one with high levels of pectin in the list above. This is the thinking behind many common (and also delicious) combinations, such as blackberry and apple.
Second, add lemon juice to the mixture.
Third, use a jam sugar that includes pectin.
Finally, add some pectin. It’s available from many stores, and generally comes as a liquid, commonly derived from apples.
Once you’re ready to set the jam, heat it up until it’s boiling rapidly – what’s known as a rolling boil. This is why you need a large saucepan: as the jam boils, it will bubble up to at least twice the volume of cold liquid.

Testing for jam setting point
There are three main ways (plus another) of testing jam to see if it’s reached a setting point.
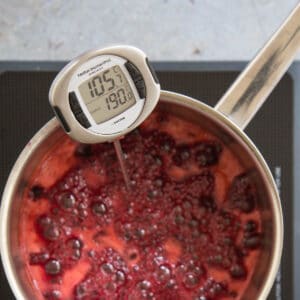
First – Temperature test

Jam will generally set once it’s reached 105°C/220°F. The easiest way to watch the temperature is with a digital thermometer. They’re easily available online for a few pounds, and I find them far easier to use than the old-fashioned brass ones. You can also get a digital thermometer with an alarm and set it to let you know as you approach setting point.
Do make sure that you stir the jam well as you take the temperature, as it’ll be a lot hotter on the bottom of the pan than at the top near the edge.
However if your jam doesn’t have enough pectin and /or acid it can reach setting temperature and still won’t set, so use temperature as a guide only.
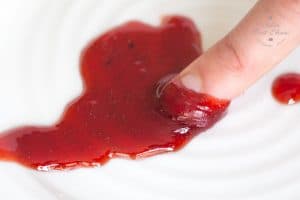
Second – Wrinkle test

This is the traditional method. Place a couple of plates in the freezer before you start cooking the fruit, so that they’re ice cold by the time you want to test for setting point.
When you want to test the set, take a teaspoon of boiling jam and tip it onto the cold plate. Allow to cool.
While you’re testing, I like to take the jam off the heat so that it stops boiling. This means that you won’t over set the jam while you’re waiting to test it. You won’t lose any set or make it more difficult to reach a set by doing this.
Push your finger through the blob of jam. It’s reached a setting point when it wrinkles ahead of your finger.
It’s a very small difference compared to unset jam, so this is a technique that rewards practice. If you boil the jam until you have large, obvious wrinkles that you will have a very hard set jam.
Test little and often!
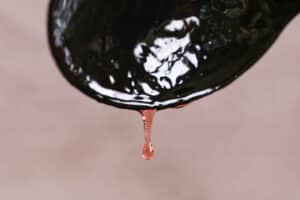
Third – Flake test

This is easy in that you need no special equipment or preparation beforehand. As the jam boils, pick up a spoonful with a large, long handled spoon.
You want one with a narrow lip and that holds a good amount of jam – so a metal or plastic cooking spoon is perfect.
Turn the spoon onto its side, so that the jam runs out back into the saucepan. When the jam is setting, you will notice a change in the way it runs off the spoon.
The last few drops, in particular, will hang from the edge of the spoon.

I like the wrinkle test, this does take a bit of practice, we think it is a more noticeable change between unset and set jam than using the wrinkle method.
The great advantage is that you can be testing like this every 30 seconds the whole time the jam is boiling and catch it at the perfect setting point.
Fourth – Appearance

One further indicator that the jam has reached a setting point is that the way it boils changes. Before the set, I find that generally it boils in a very frothy way, with a foam of small bubbles.

As it nears a set, the bubbles get much larger, less effervescent, and lower in the pan.
I use a combination of the temperature and flake tests. I watch the temperature, and then as the jam or jelly starts to reach 105°C, I start to use the flake test.
Preserving at altitude
If you are at altitude set point will be at a different temperature and your jam / jelly may need additional treatment to preserve safely please research and adjust accordingly.
I have not preserved at altitude and cannot advise.
My jam isn’t set, what can I do?
Don’t worry! If you’ve filled your jam jars but find that it’s still runny even after cooling down (yes it happens to us on occasion) first leave it for a week – often time is what is needed to get it to set.
- Everything you need to know about how to fix runny jam
If it is still runny you can simply return it all to a saucepan and heat it again to set it, but go gently as often it will only need to boil for a minute.
Or, you can simply re-purpose it – unset strawberry jam makes for a very good ice cream topping!
My jam is over-set!
If you find that after cooling, your jam or jelly is too hard and rubbery, not all is lost. Whisk it in a saucepan with a splash of water over a low heat and pour it back into the jam jars.
It probably won’t be hot enough to form a vacuum seal in the jar, so it’s best to keep it in the fridge. However, if the jam has got too hot and the sugar has caramelized and you have a distinct burnt toffee flavour, then there’s not much you can do ad you are better off putting it down to experience and starting again.
Easy Jam Recipes
These are a few of my smaller batch jam recipes that are easy to get a set with
- Mixed Berry Jam – uses a bag of frozen berries, and makes an intensely fruity easy to set jam
- Fig jam – rich and intense, delicious for breakfast!
- Blackberry & apple jam – just three ingredients – the added apple takes care of the set.

How to get a perfect jam set
Instructions
The Temperature Test
- Jam will generally set once it’s reached 105°C/220°F. The easiest way to watch the temperature is with a digital thermometer.
- Do make sure that you stir the jam well as you take the temperature, as it’ll be a lot hotter on the bottom of the pan than at the top near the edge.
- Temperature is only a guide – some jams need to be a little hotter to set. if the jam doesn't contain enough pectin, sugar or acid it might still not set.
The Wrinkle Test
- Place a couple of plates in the freezer before you start cooking the fruit, so that they’re ice cold by the time you want to test for setting point.
- When you want to test the set, take a teaspoon of boiling jam and tip it onto the cold plate. Allow to cool.
- Push your finger through the jam. It’s reached a setting point when it just wrinkles ahead of your finger. It’s a very small difference compared to unset jam, so this is a technique that rewards practice.
- If you boil the jam until you have large, obvious wrinkles that you will have a very hard set jam; so it is best to test little and often.

The Flake Test
- This is easy in that you need no special equipment or preparation beforehand. As the jam boils, pick up a spoonful with a large, long handled spoon. You want one with a narrow lip and that holds a good amount of jam – so a metal or plastic cooking spoon is perfect.
- Turn the spoon onto its side, so that the jam runs out back into the saucepan. When the jam is setting, you will notice a change in the way it runs off the spoon. The last few drops, in particular, will hang from the edge of the spoon.
Once setting point is reached
- Allow the jam to cool for a few minutes, and then pour into heated and sterilised jars and seal the lids. Allow to cool before labelling.


Leave a Reply