The King asked The Queen, and The Queen asked The Dairymaid: “Could we have some butter for The Royal slice of bread?”
The price of butter has risen dramatically in recent years, perhaps to offset the low price of supermarket milk. Many of us, however, feel with the king in A. A. Milne’s poem that there’s no substitute for the real thing.
Making my own butter was something I’d never really considered until I picked up several reduced price cartons of cream in the supermarket one evening. Always on the lookout for a bargain, I decided to get my stand mixer out and give homemade butter a try.
It is immensely satisfying to make the sort of product that we normally buy and get the same result or better. (It’s also super impressive for anyone not in the know!) It is also the ultimate one ingredient recipe. You just need double (or heavy cream) and a stand mixer, or whisk, or even a jar.
Why Make Butter?
It will make you feel like a domestic goddess or an old school pioneer!
It is delicious and also seriously impressive.
If you managed to buy some reduced cream at the store it is far cheaper than buying regular butter.
You can have genuinely unsalted butter.
It’s a great fun activity to do with children, with an enjoyable end product and curriculum relevance for science, technology and history (hidden learning, just like hidden vegetables!). If you find yourself back to home learning, why not treat it as an experiment?
Churned, whey or cultured butter?
Most butter is churned butter, which is what this recipe will produce.
You may also find whey butter, a byproduct of cheese making, which is saltier and sharper.
Cultured butter is another with added bacterial cultures (like those used in yogurt making) which is slightly fermented to produce a more acidic flavour. You can mimic this by adding a generous dollop of full fat live yogurt to the cream.
How to make Homemade Butter
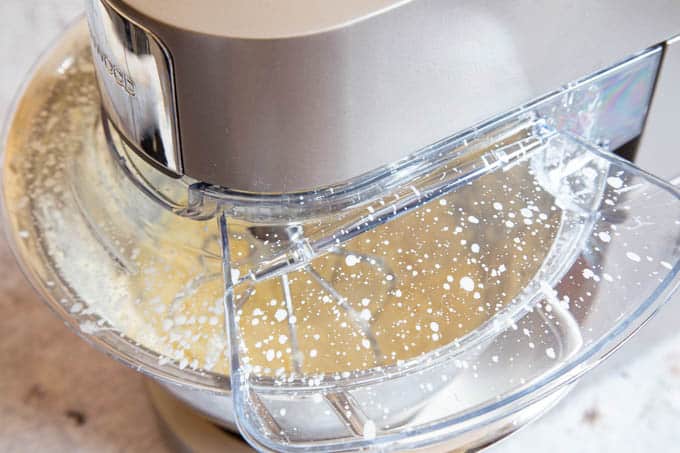
Step one – Pour the cream into the bowl of a stand mixer and whisk. Start on slow and gradually increase the speed.
Fuss Free Tip
Use the stand mixer’s splatter guard!
Step two – The cream will first whip and then thicken. Then, once it has split into clumps of butter and liquid buttermilk, stop whisking.
Step three – Strain the butter and buttermilk. You can do this using a sieve lined with a muslin cloth, or use a jelly bag. Reserve the strained buttermilk, as it is useful for making pancakes or baking.
Step four – Wash the butter under the cold tap, or in a bowl of cold water using a squeeze and rinse technique:
First, keeping the butter wrapped in the muslin or jelly bag, give it a good squeeze to remove as much of the buttermilk as possible. Then break the butter into small pieces and rinse with cold water. Repeat this several times.
You can test to see if you have removed all the buttermilk by submerging the still-wrapped butter in a large bowl of iced water. Squeeze it. Any remaining buttermilk will make the water go cloudy. Rinse and repeat until the iced water remains clear when you squeeze the butter.
It is really important to wash all the remaining buttermilk from your freshly made butter. Buttermilk will turn rancid in a day or so, and this will spoil the butter.
Fuss Free Tip
If it is a hot day you might have to pop the butter in the fridge to chill and firm up a little half way through the rinsing. Don’t forget about it however – it still needs to be malleable.
Step five – Shape your fresh butter into pats or logs. Store it in a covered butter dish or in the fridge.
No Stand Mixer?
It is far easier to make homemade butter in a Kitchen Aid or other stand mixer. It is, however, perfectly possible to make with a regular electric whisk, food processor or blender. I’ve made it in a deep container with a stick blender before.
If you are making butter with children, remind them that for centuries people had to hand churn their butter without any electrical aids. It was hard work! Children might like to try making butter the hard way by half filling a jar with the cream, putting the lid on tight and shaking the jar vigorously for 5-10 minutes.
Yield of homemade butter
A 600ml carton of cream will give you about 250-270g of butter and about 250ml of buttermilk.
Salted & Flavoured Butter
You can add salt before you whisk the cream. Use about 1/2 tsp per pint. Salted butter will be more yellow in colour than the whiter unsalted butter. The salt is a preservative, so salted butter tends to keep longer.
To make flavoured butters, you can add fresh chopped herbs, pepper, garlic or ground spices such as chilli to taste.
Storing Homemade Butter
Your homemade butter will last 3–5 days at room temperature, or for a week to 10 days in the fridge. It is imperative that you rinse it properly after making it.
If you want to keep your butter for longer, or have any doubts that it is properly rinsed, then you can freeze it. I like to portion it into a mini muffin pan and chill it before popping it out of the pan and freezing.
Hints & Tips
You must rinse the butter properly once it is made!
You can make butter in a stand mixer (the easiest option) or with an electric whisk, blender, food processor or with a stick blender.
If using a stand mixer, use the splatter guard.
I’ve made butter in a stand mixer using either the whisk or the main beater.
Recipes using buttermilk
The buttermilk will keep for a few days in the fridge and will make the fluffiest lightest muffins, pancakes and bread. And here are some more ideas for inspiration.
It is also delicious for breakfast on toast after a bowl of homemade muesli, or spread on a slice of fruit loaf.
Tried this recipe?If you try this recipe please tag #FussFreeFlavours on Instagram or X (Twitter). It is amazing for me when you make one of my recipes and I really do love to see them. You can also share it on my Facebook page. Please pin this recipe to Pinterest too! Thanks for reading Fuss Free Flavours!
Pour the cream into the bowl of a stand mixer and whisk. Start slowly and slowly turn the speed up.
The butter will turn to whipped cream and then after a couple of minutes will split and separate into clumps of butter which will slosh around in the buttermilk.
Pour everything onto a sieve lined with a muslin cloth, or through a jelly bag. Save the buttermilk for other recipes.
Once strained, give the butter a rinse with fresh cold water, then gather up in the cloth or bag and squeeze.
Break the butter into small clumps and repeat the rinsing and squeezing process twice more. It is important to make sure you have removed all the buttermilk as this will quickly turn rancid and spoilt the butter.
Roll or shape the fresh butter into pats or a log.
Notes
Your homemade butter will last 3–5 days at room temperature, or for a week to 10 days in the fridge, or several months tightly wrapped in the freezer.
• Please note that the nutrition information provided below is approximate and meant as a guideline only.
• Unless stated otherwise cup conversions have been made with an online tool. For accuracy please check with your favoured conversion tool. We recommend buying inexpensive digital kitchen scales.
Course: Ingredient
Cuisine: Traditional British
Keyword: Homemade butter
Delicious Recipes Emailed To You!Get easy, tasty recipes for FREE when you subscribe! Click to Subscribe Now!!
Recipe for homemade butter first published April 2012. Updated with new photos, step by step instructions, and hints & tips September 2020.
Wonderful, I made some for the first time a few months ago, and loved it. We used the buttermilk for soda bread, a perfect supper, homemade bread and butter! Jude x
This is such an exciting make, who knew something so simple could be so fulfilling. The washing bit was the most time consuming, but overall, really easy.
This blog is a participant in the Amazon Services LLC Associates Program, an affiliate advertising program designed to provide a means for sites to earn advertising fees by advertising and linking to amazon.com. All our thoughts and opinions are our own and we are not paid for or mandated to provide a positive review.


Jude - A Trifle Rushed
Wonderful, I made some for the first time a few months ago, and loved it. We used the buttermilk for soda bread, a perfect supper, homemade bread and butter! Jude x
Helen
It is so satisfying to make isn’t it.
Kavey Eats
Love it! Used to have homemade butter when visiting India as kid…
Helen
It really is delicious, and I felt very happy with the results.
Laura@howtocookgoodfood
I just love this, how can something so useful be so easy to make?! Must try xx
Helen
So easy and so satisfying too.
Grace L
This is such an exciting make, who knew something so simple could be so fulfilling. The washing bit was the most time consuming, but overall, really easy.
Helen
So important to wash all the buttermilk out, but you soon find a knack.
Linda Holland
Love this, Helen. It really did make me feel like a domestic goddess! Definitely making it again.
Helen
Nothing better than the domestic goddess feeling.