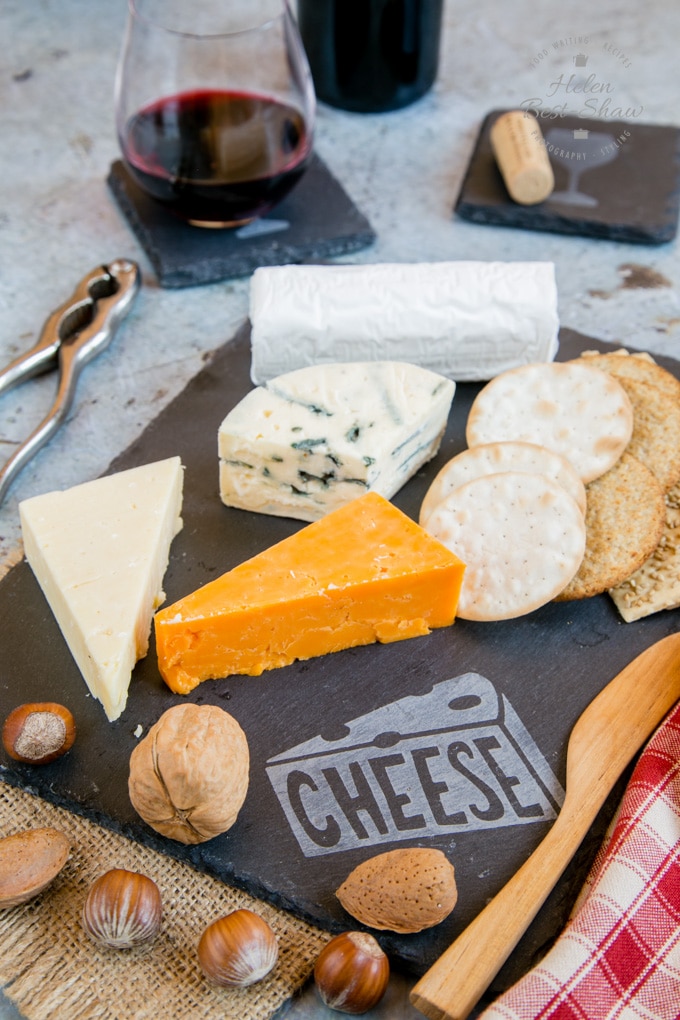
It is so easy to make your own professional looking etched slate cheeseboard and coasters at home, with the help of the Cricut Maker electronic cutting machine.
This is a sponsored conversation written by me on behalf of Cricut. The opinions and text are all mine.
My Cricut Maker is the latest addition to home, and is proving surprisingly versatile with the number of kitchen and food related projects I can use it for.
The Cricut is a computerized die cutting machine, mainly known for its use for papercraft, vinyl and fabric iron on. The Cricut Maker is so much more than that, with its interchangable blades it can cut over 100 materials, from every type of paper and card, fabrics from the most delicate organza to the thickest denim with the rotary cutter, to thick leather and balsa or bass wood with the knife blade.
You design on your computer, phone or tablet in the Cricut Design Space software, select your material and the machine does the rest. Watching the machine work is simply mesmerizing as it can cut a large area remarkably intricately.
As well as the thick toughest material the Cricut Maker is sensitive enough to cut through just one layer of sticky tape. It is a marvel of engineering and huge fun to play with with the endless possibilities.
What really excites me about the Cricut Maker is that is enables the non artistic to be creative and to make. I love making things and being creative but I am not in the slightest bit artistic.
The Cricut Maker easily enables the non artistic to be creative!
The Easy Way to Etch Slate With the Cricut Maker
I jumped right in with a kitchen project to make an etched slate cheeseboard and coaster set – perfect for a present, or housewarming – and easily personalized.
Firstly gather up your supplies – you need
- Cricut machine (I use the Maker) but the older Cricut machines which can cut vinyl are all perfect for this project
- Mat
- Vinyl to make the stencil (use scraps as the colour doesn’t matter)
- Transfer tape
- Etching cream – Armour Etch is available on Amazon both in the UK and US.
- Small paint brush
- Slate place mat and drinks coasters
- Cricut tools – scissors, scraper and weeding hook
- Hairdryer
Step One – Choose your images in Design Space – I picked 4 different glass shapes and a cheese logo.
Cheese wedge #M877990C
Drinks glasses (from the Restaurant Icons cartridge)
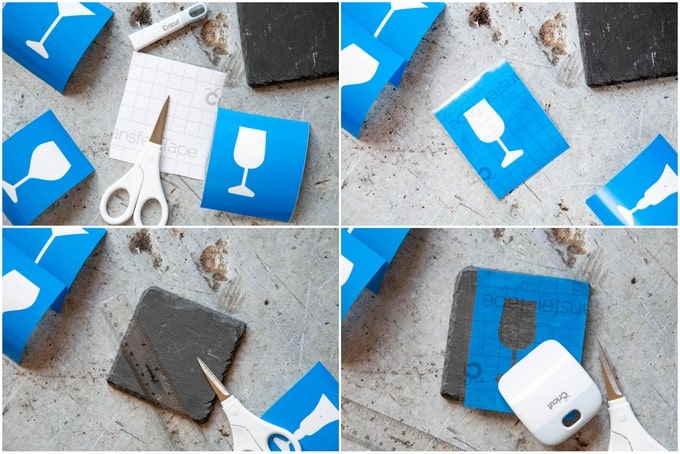
Size for your slates, arrange so there is some spare vinyl around each one and send to cut. Weed – remember that as you are etching you are making a stencil – so remove the bits that you want etched on the final design
Step Two – Apply transfer tape to the vinyl, then peel the backing off.
Step Three – Make a light scratch in the middle of each coaster to help with positioning the stencil.
Step Four – Apply the vinyl and transfer tape to the slate and use the scraper to help it stick.
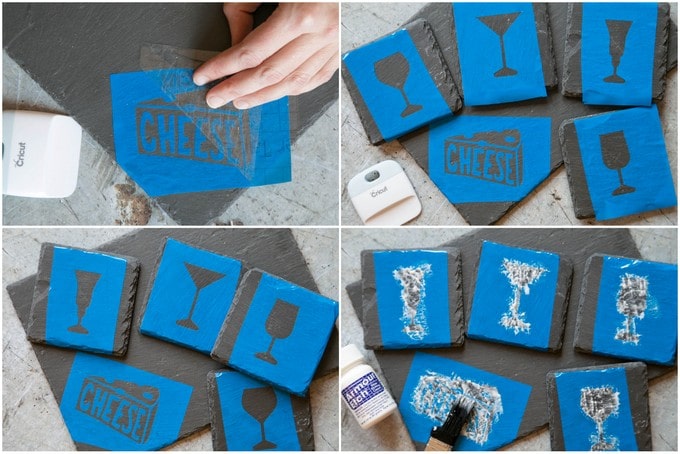
Step Five – carefully peel the transfer tape away – I found that the vinyl doesn’t stick that well to the slate so peel slowly. With the non fussy cuts like the glasses you can use each piece of transfer tape several times.
Step six – seven – blast the vinyl with a hairdryer so it softens, then use a duster to press the vinyl into all the bumps on the slate, repeat as necessary paying attention to all the edges, corners and small pieces. Don’t be tempted to skip this stage as it is crucial to getting a sharp edge to the etch. Reheat the vinyl and repeat if needed.

This was my test etch – see how the etching cream bled and none of the edges are sharp.
Step eight – Use the paintbrush to dab; rather than brush, a thin coat of the Armour Etch cream onto the slate, taking care not let it go over the edge of the template. If needed use painter’s tape to mask the exposed ares of the slate. Wear gloves if you think you will get the etching cream on your skin.
Leave for 5 minutes, then give the etching cream another dab or prod with the brush. After another 5 minutes rinse the cream off under a running tap, avoiding any exposed slate, then wash with washing up liquid and a soft brush.
Warning: do not rinse the etching cream into a ceramic sink, or you will risk etching it too!
Peel off the vinyl, wash everything again and leave to dry. As the slates dry the design will magically appear!
If you get grease or oil on the etched areas they will fade, but a good scrub with a soap and a washing up brush will bring the design back.
How to Make an Etched Slate Cheeseboard With The Cricut Maker
Ingredients
Materials Needed
- Cricut machine
- Cricut cutting mat
- Vinyl
- Transfer tape
- Etching cream – Armour Etch
- Small paint brush
- Slate place mat and drinks coasters
- Cricut tools – scissors, scraper and weeding hook
- Hairdryer
Instructions
- Choose your images in Design Space – I picked 4 different glass shapes and a cheese logo.
Cheese wedge #M877990CDrinks glasses (from the Restaurant Icons cartridge) - Size the images appropriately for your materials - I recommend leaving at least 1/2" between the edge of the slate and your design.
- Weed the design - remember you are removing the parts you want on the final item, so the opposite way round to usual. Cut into separate pieces.
- Arrange the shapes in design space so there is at least 2"/5cm between each and send to cut on some scrap removable vinyl.
- Apply the transfer tape to the weeded vinyl and then peel the backing tape off.
- Make a light scratch in the middle of each coaster to help with positioning the stencil.
- Apply the vinyl and transfer tape to the slate and use the scraper to help it stick then carefully peel the transfer tape away – I found that the vinyl doesn’t stick that well to the slate so peel slowly. With the non fussy cuts like the glasses you can use each piece of transfer tape several times.
- Blast the vinyl with a hairdryer so it softens, then use a duster or soft cloth to press the vinyl into all the bumps on the slate, repeat as necessary paying attention to all the edges, corners and small pieces. Don’t be tempted to skip this stage as it is crucial to getting a sharp edge to the etch. Reheat the vinyl and repeat if needed.
- Use the paintbrush to dab; rather than brush, a thin coat of the Armour Etch cream onto the slate, taking care not let it go over the edge of the template. If needed use painter’s tape to mask the exposed ares of the slate. Wear gloves if you think you will get the etching cream on your skin.
- Leave for 5 minutes, then give the etching cream another dab or prod with the brush. After another 5 minutes rinse the cream off under a running tap, avoiding any exposed slate, then wash with washing up liquid and a soft brush.Warning: do not rinse the etching cream into a ceramic sink, or you will risk etching it too!
- Peel off the vinyl, wash everything again and leave to dry. As the slates dry the design will magically appear!
Notes
The Cricut Maker has a RRP of £380 and is available directly from Cricut, as well as Amazon, Hobbycraft and Hochanda all of which have regular offers and discounts
Disclosure – I received a Cricut Maker, accessories and materials as a gift from Cricut. All opinions our own.










Ashleigh Dougherty
I love this idea and it would be a great way to make gifts for people too!
Helen
It is such fun, and the etching is different from the usual papercraft and vinyl projects.
Louise Joy
This is awesome and a great way to make personalized gifts. I have a friend who looooves cheese, so she would love this slate! I bet you could use this to make gifts for your entire Christmas list! x
Helen
I could, but I need to start crafting now!
Rebecca Smith
What a beautiful cheeseboard! I think I need to get one of these Cricut machines!
Helen
the machine is SUCH fun and it does so much
Rhian Westbury
Wow that looks so good for you to have done this yourself, very professional looking x
Helen
thanks – really fun craft, and actually very easy.
Kara
Wow, who knew you could do this at home – I want one
Helen
SO many possibilities!
Tanya Brannan
I haven’t heard of a Cricut machine before but now I want to get one! I love the fact that you can cut lots of different materials and the cheeseboard looks super simple.
All I am wondering now is if the Armour Etch cream comes in different colours!
Helen
These smart cutting machines are so smart. The etching cream doesn’t colour – you can colour the etch afterwards
Eva Katona
Oh this is such a perfect DIY gift idea – I bet it could also be used for upcycling things!
Helen
the only limit is your imagination!
Sarah
Aw this is a fab diy! They all look fantastic. They’d totally make great gift ideas too!
Helen
Perfect for gifts, and also very easy to personalize.
admin
oh Helen I am utterly obsessed with a Cricut Maker. I have never ever heard of one! – it looks like my kind of craft activity. Your slates look amazing!
Helen
I am SO obsessed with it and just how clever the engineering that made it is.
Barbara
Thank you so much for these excellent instructions. I used this method to etch slate coasters for my daughter and her husband. I wanted to use an Old English font, so it was a very complicated design, but it turned out beautifully! Thanks again!
Helen Best-Shaw
Fantastic. i really enjoy etching with the Cricut.