

My self raising flour bread is one of the easiest no yeast breads you could ever make, producing a delicious loaf in less than an hour with very little effort and just four ingredients.
Perfect for anyone who needs a fresh loaf in a hurry, easy enough for all for new bakers!

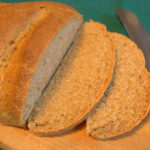
Self raising flour bread
Can self raising flour be used for bread? Yes, absolutely! The resulting bread is a lovely rustic loaf that you can rustle up with just four ingredients.
This self raising flour bread recipe produces a no yeast loaf that is similar to soda bread but without that slightly bitter taste, using regular everyday flour – no need for strong bread flour!
It’s perfect for a quick lunch, delicious warm and fresh from the oven slathered with butter. Make it whenever you run out of your usual bread or when you want something fresh to serve to unexpected guests.
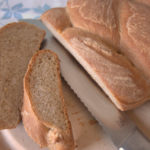
This sort of bread doesn’t last long in our home, but if you have any left over, slice and toast it the next day.
Why make this self raising flour bread
- It’s quick and easy.
- No kneading.
- No yeast.
- No rising/proving time needed. Just mix, shape and bake.
- Just four ingredients, and one of those is optional!
What is self raising flour?
Self raising flour is just plain flour with added raising agents – usually sodium bicarbonate and calcium phosphate, which are the active ingredients of baking powder. By By using a mix of these two ingredients you don’t need to add something acidic to get a loaf or bake to rise.
If you baking with baking soda as the only raising agent you need to add something acidic to react with the baking soda so the mixture rises. This is why you need (acidic) buttermilk to make a soda bread.
Ingredients for self raising flour bread

Only four ingredients!
- White self raising flour – This needs to be reasonably fresh and not out of date for this bread recipe. If your flour has been in the cupboard too long, the raising agents may have oxidised and won’t work. Make scones, cakes etc. to use flour while it is still in date. Treat yourself! We are not using bread flour for this recipe!
- Salt – Ordinary cooking salt, or if you prefer, posh sea salt.
- Milk – Full, semi skimmed or skimmed, dairy or plant based. Fresh or made up from dried powder! It doesn’t matter. Just use what you have.
- Oil – This makes the loaf last longer and is optional! Bread is best enjoyed fresh, though. This loaf is best fresh from the oven, or toasted on day 2.
How to make self raising flour bread

Step 1 – Gather your ingredients. Heat the oven to 190°C Fan (210°C regular) / 375°F /Gas Mark 6. Put a baking sheet or stone in the oven to heat. Mix the flour and salt in a large bowl.

Step 2 – Add the milk and oil, and mix the ingredients in the bowl until they come together into a rough dough.

Step 3 – Turn the dough out onto the work surface and give it a very quick knead until smooth. It doesn’t need a lot of work.

Step 4 – Form into a flat disc, no more than about 1½”/3 cm thick. Important! Your dough must not be too thick. If it is, the bread won’t rise or bake through properly.

Step 5 – Score the top in a deep cross, cutting most of the way through the dough. As you can see, it’s formed into a round pancake, about 1½” (3 cm) thick, and deeply scored with a cross across the top.
Put the dough on a silicone baking sheet or piece of baking parchment. Then place in the oven on the hot baking stone or sheet and cook for about 35 minutes. The bread will still be quite pale once cooked. Don’t expect, or wait for it to be golden brown.

Step 6 – The bread will rise as it cooks. Check the bread is cooked by flipping it off the baking sheet and giving it a tap. If it is done, it will sound hollow. Remove from the oven, and allow to cool enough to enjoy!
Self Raising Flour Bread – FAQs, Hints and Tips
What happens if you add yeast to self raising flour?
There’s no point in trying this, as you don’t leave the dough to rise. This is a no yeast bread.
Can I use bread flour?
Self raising flour is usually everyday flour for baking pastry, cakes etc. It is a different product from bread flour which has a higher amount of gluten.
Can I make a vegan self raising flour bread?
Absolutely yes! Use your favourite soy or nut milk.
Can I make this gluten free?
Sadly not – I have tried with a straight swap to gluten free flour and it wasn’t successful. Let me know if you manage it.
Can I freeze self raising flour bread?
Yes, this self raising flour bread freezes well. I like to slice it, wrap in a plastic bag, freeze, then toast from frozen.
Can I make self raising flour bread using cup measures?
Yes! But never mix cups and metric measurements. I have included conversions in the recipe below, but please check using your favourite trusted conversion tool. I scale my conversions to give rounded numbers so the amounts are never a direct conversion.
Having said that, I recommend buying kitchen scales. They are inexpensive and will result in far better baking as they are so much more accurate than using cups. Once you get used to them, weighing ingredients will become second nature.
Can I make this with wholemeal flour?
Absolutely – here is the recipe for wholemeal no yeast bread.

Troubleshooting – mistakes to avoid
This recipe really works. We have made this loaf successfully many many times. Here are some of the common problems people have how to make sure you avoid them.
- The measurements are wrong – I always weigh my ingredients, cup conversions are not always accurate. If the dough is too dry, add more liquid. If the dough is too wet, add more flour.
- The dough is over-handled – it needs a light touch and gentle shaping.
- The dough is too thick and hasn’t been scored. Those score marks are not just for decoration. The bread will not rise and it will not cook in the middle without them.
- The oven is at the wrong temperature. Too hot and the outside will burn before the inside is cooked. Too cool and the bread won’t rise. Most oven thermostats are inaccurate and will be consistently too hot or too cold. If you plan on baking more than once a month, buy an oven thermometer and adjust the thermostat to reflect the real temperature.
- Your flour had been in the cupboard for too long and the raising agent had gone off. Self raising flour lasts well, but it will eventually go stale.
Serving suggestions
Because the loaf doesn’t have much time to rise, your no yeast bread will never have a particularly light texture. This self raising flour soda bread style recipe will always result in a hearty, rustic loaf that’s at its best fresh from the oven and dripping with butter.


Self Raising Flour Bread
Ingredients
- 400 g (4 cups) plain flour (regular white self raising flour)
- 1 tsp (1 tsp) salt
- 250 ml (1 1/3 cups) milk
- 1 tbs oil (optional)
Instructions
- Heat the oven to 190°C Fan (210°C regular) / 375°F / GM 6. Place a baking stone or heavy baking sheet in the oven to heat.
- Mix the self raising flour and salt in a large bowl.
- Add the milk (and oil, if using), and stir together to form a dough.
- Turn the dough out onto your work surface and knead briefly until the dough has a uniform consistency.
- Shape the dough into a round disc, about an inch to an inch and a half (about 3 cm) thick. Score the top deeply with an X. This is important! Don't make a round ball of dough as it won't cook in the middle.
- Bake on the hot stone or baking sheet for about 35 minutes until risen and the crust is hard. (This loaf won't turn a deep gold so don't wait too long to check it.) When ready, it should sound hollow when tapped on the bottom.
Notes
- Important! We cannot stress enough that the dough needs to be a flat pancake not more than 1.5″ (3 cm) deep when it goes into the oven, or it will not cook properly in the middle.
- If you don’t have milk, you can make some up with powdered milk, mix up yogurt and water. You can even use water with a spoon of oil or melted butter or spread.
- Delicious served freshly baked for breakfast with our homemade Seville orange marmalade


Melanie
A perfect use of some flour I had in the cupboard. Just lovely while it was fresh, and very moreish. It had a good crusty outside. Delicious.
Becca
I love making bread at home, it always makes me feel like I have achieved something great. This is a great recipe that makes it really easy. A quick and tasty bread.
Sally Potter
Lovely crusty bread with a good flavour, and perfect to have with soup. Great that there is no fussing with yeast.
Gail Matthews
This is a good bread for using on the day. Simple and easy to make. And I do so love homemade bread, party the delicious smell of it.
Lynne
I love how easy this was to make. I’m often out off from making bread due to the whole process of waiting and such. It was deliciously fresh and I feel very proud of myself now.
Evie B
Such a quick method of making bread. I wasn’t sure if i would work, but it is really good tasty bread. Brilliant.
Naomi
This is brilliant, Helen. Absolutely no fussing and the results were very tasty.
candy fellows
I was delighted at the results of this recipe, it makes a good quick and easy loaf. As stated it isn’t a bread to last and I found it dried out very quickly. Great on the day you make it.
beverley
This was a successful loaf of bread, and very easy to make. Obviously different from bread with yeast, but an all round decent make.
Daisy Pratt
I am all for making things as easy as possible and this bread is exactly that. Crispy on the outside, soft in the middle, it makes a delicious bread loaf.
Lynette
Would it work if i made rolls with this?
Ariel
Did not expect this to turn out as good as it did, but as I was short on time and had no plain flour in I decided to try it and was so glad I did! I used olive oil which was optional, and also cooked it on 190 in my halogen oven in case anyone is wondering if it works in there- turned out amazing! Nice and crusty on the outside and soft in the middle- perfect with a winter blended veggie soup. I brushed the top of the loaf with garlic butter once it was cooked which added a nice colour and flavour. Will definitely be making again considering it is so quick and easy! Thanks!
Helen Best-Shaw
Love the idea of brushing the top of the bread with garlic butter! yum!
El
This came together quickly and was surprisingly good. We really enjoyed this with our dinner and look forward to having it with jam at breakfast. Saving the recipe to my favorites. Thank you for sharing this quick and easy no fuss bread.
David
Really was quite quick and tasty.
Really more like an Irish soda bread — hardly appropriate for the sandwiches I was making! But should be wonderful at breakfast time with preserves!!
Thanks
Helen Best-Shaw
It isn’t a sandwich bread – but it is so good for breakfast hot from the oven slathered with melted butter and jam.
Ken
Ok, so it really was that easy! I added about 2 Tbsp of dried onion flakes…smells and tastes delicious!
Helen Best-Shaw
that is a great addition!
Tina
First time ma I ing this recipe and it came out perfect!
Chilli
Sounds wonderful. I’ll have to give it a try! TYFS
Elana France
Really easy to make and a nice crust. Definitely doesn’t compare to a traditional bread which rises slowly to form a nice and spongey fluffy texture, however, I was out of plain flour and this was so quick and easy to pull off, so I’m very grateful to have this kind of recipe for those kind of days!
Helen Best-Shaw
Hi Elana, I am so happy you found this useful. It is such a good standby.
Janice
Hi Helen, could I use the whole wheat flour and the baking powder instead ? If so, how many grams of baking powder ? Thank you.
Helen Best-Shaw
You can, and there is a recipe here https://fussfreeflavours.com/wholemeal-self-raising-flour-bread/
Charmaine Hoke
could this be divided into 3 and make 3 small loaves
Helen Best-Shaw
Yes – cook for a little less time.
Trish A.
Rather like a large biscuit. But delicious. Definitely as the recipe describes. Rustic and hearty.
Heather
This was surprisingly good. I really only tried this recipe because I had SF flour to use up. I preferred this to savoury scones. Very simple recipe to follow.
Kath
Great recipe! Stuck for bread, make a loaf every couple of days in bread machine, but due to snafu, no flour.
Self-rising flour only available. Found this recipe, made it with alacrity, and bingo, we (hubby & self) loved it.
Fast, easy, tasty. Recommend going out for a walk after baking finished. Come back home and … house filled with gorgeous aroma.
Keeper.