Yogurt bread is the softest, lightest fluffiest loaf you’ll ever bake. As easy to bake as it is to slice, it’s perfect for sandwiches, and toasts beautifully. People won’t believe it is homemade.
Home baked bread is a delight, and I can’t remember the last time we bought a loaf from the shop. We usually make sourdough, but sometimes you want a classic white bread – tall and soft and perfect for slicing, toasting and sandwiches.
Adding dairy to a loaf makes for a much softer crumb – you can use milk, melted butter or yogurt.
We nearly always have a pot of natural yogurt in the fridge; it is an adaptable ingredient – add to smoothies, on your breakfast, topped with seeds as a snack, whizzed into dips and as a cooling antidote to over spiced dishes! It’s also a great addition to bread recipes, as I’ve done here.
Why You Will Love This
Adding yogurt is an easy hack for the softest, fluffiest loaf you will ever make.
Using yogurt makes the dough rise quicker and more than usual, so you get your bread faster.
Once baked the loaf slices beautifully.
You can freeze and then toast from frozen, so it is perfect for batch baking!
How to Make Yogurt Bread
Here is how to make it, step by step with additional hints and tips.
Firstly measure out the ingredients. The water should be lukewarm: if it’s cold straight from the tap, add a splash of boiling water. It doesn’t have to feel warm, just “not cold”. Use either cup measurements or by weight – don’t mix and match the two.
Fuss Free Tip
Yeast choice – you can use quick yeast or activated yeast in this recipe. Activated yeast needs to be dissolved in water, while quick yeast can be mixed with the flour. The instructions are for activated yeast – if using quick yeast add it along with the flour.
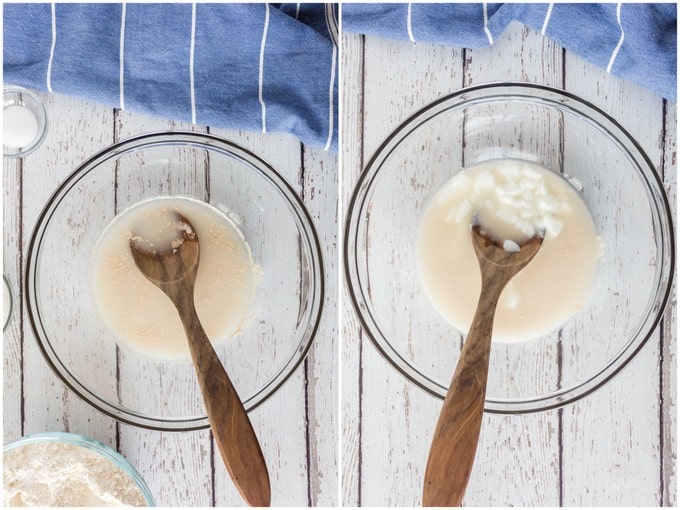
Step one – pour the water into the bowl of a stand mixer, if you have one. Don’t worry if you don’t, just use a large mixing bowl. Add the yeast and swirl to dissolve. Then add the yogurt.
Step two – Add the flour and salt. If using a stand mixer, mix using the dough hook on a low speed for about 5 minutes, until smooth and stretchy.
If you’re not using a stand mixer, mix with your hand in the bowl until the dough has come together, then turn out and knead on the work surface until it has become a smooth, pliable, stretchy dough. This will take about 8 to 10 minutes.
Step three – place the dough back in the bowl, cover with a tea-towel, plate or similar (a clean plastic shower cap is ideal) and leave somewhere relatively warm until doubled in size. This will take about forty five minutes.
Dough Rising Tip – if you re new to bread making and want to see how much your dough has risen, use a straight sided transparent plastic pot, one where the dough completely covers the bottom. Mark the side with a bit of tape or a marker pen, and when it’s risen to twice that height, it’s ready. This is much easier than trying to guess when a ball of dough has doubled in size.
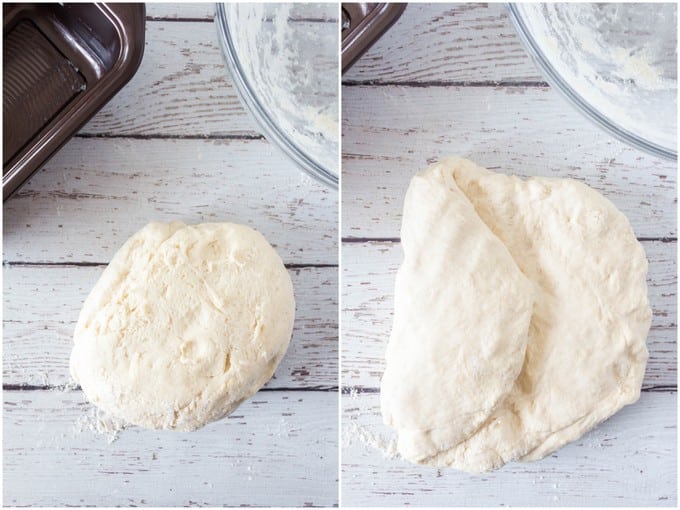
Step four – turn the dough out onto a floured work surface. Butter a 1lb/450g (9″ x 5″) loaf tin – I find that butter works much better than oil and the loaf comes out of the tin much easier. Fold the dough into thirds, and then roll into a tube as long as the loaf tin.
Place the dough into the tin, cover again with the shower cap (if you have one), pulling it up to give the dough space to rise. If you don’t have a shower cap, place the tin in a plastic bag and tie shut, of cover with some cling film. Place the tin in the warm location used in step three above.
Step five – After about 15 minutes rising time, heat the oven to GM7 / 220C / 425F. Leave the dough to rise for about a further 15 to 20 minutes, until it’s just springing back when pressed. Bake for about 35 minutes. The yogurt bread is cooked when it sounds hollow when removed from the tin and tapped on the bottom.
If in doubt pop the loaf back on the oven shelf (out of the tin) for another 5 minutes.
Hints, Tips and Variations
If you are using activated yeast it is important to make sure it has properly dissolved before you add the flour. Some sources tell you to add a spoon of sugar and wait until it is frothy, but we have never found it makes a difference. BUT if you have had the yeast for some time it might be an idea to add a little sugar and to wait to check if the yeast is still good.
Timings vary dramatically by age of the yeast, temperature, brand of flour, humidity and altitude. Go by the volume of the dough, not the time.
For a crustier loaf place a small dish of water in the oven under the bread as it bakes.
This recipe freezes very well – we slice and then toast from frozen. Once you are confident double the recipe and make two loaves.
For another delicious bread recipe using fermented milk, make my kefir raised bread. Or love bread in general? See all our bread recipes!
Tried this recipe?If you try this recipe please tag #FussFreeFlavours on Instagram or X (Twitter). It is amazing for me when you make one of my recipes and I really do love to see them. You can also share it on my Facebook page. Please pin this recipe to Pinterest too! Thanks for reading Fuss Free Flavours!
This white yogurt bread recipe makes the lightest, fluffiest loaf; it slices thinly, perfect for sandwiches & toast. You won't believe it is homemade! Use either cup or gram measurements - don't mix and match!
1tspyeast ((7g sachet) dried active for hand baking)
1/4 cup + 3 tbsp(0.40cups)low fat natural yogurt(100 g )
3 cups+ 6 tbsp(3.4cups)strong white bread flour(425 g)
1tspsalt(1 tsp)
Instructions
Pour the water into the bowl of a stand mixer, if you have one. Don’t worry if you don’t, just use a large mixing bowl. Add the yeast and swirl to dissolve.
Add the yogurt and mix into the water, then add the flour and salt. If using a stand mixer, mix using the dough hook on a low speed for about 5 minutes, until smooth and stretchy.If you’re not using a stand mixer, mix with your hand in the bowl until the dough has come together, then turn out and knead on the work surface until it has become a smooth, pliable, stretchy dough. This will take about 8 to 10 minutes.
If kneading by hand put the dough back in the bowl then cover with cling film (or a plastic shower cap) and leave to prove until doubled in size (in a warm place for about 35 mins)
Turn the dough out onto a floured work surface. Butter a 1lb loaf tin – I find that butter works much better than oil and the loaf comes out of the tin much easier. Fold the dough into thirds, and then roll into a tube as long as the loaf tin.
Cover again with the shower cap (if you have one), pulling it up to give the dough space to rise. If you don’t have a shower cap, place the tin in a plastic bag and tie shut. Place the tin in the warm location used in step three above.
After about 15 minutes rising time, heat the oven to GM7 / 220C / 425F. Leave the dough to rise for about a further 15 to 20 minutes, until it’s just springing back when pressed.
Bake for about 35 minutes.
When it is done it should turn out of the tin and sound hollow when tapped. It always takes longer to bake than you think it will, so my general rule of thumb is that if you are unsure give it another 5 mins.
Notes
Yeast choice – you can use quick yeast or activated yeast in this recipe. Activated yeast needs to be dissolved in water, while quick yeast can be mixed with the flour. The instructions are for activated yeast – if using quick yeast add it along with the flour.
If you are using activated yeast it is important to make sure it has properly dissolved before you add the flour. Some sources tell you to add a spoon of sugar and wait until it is frothy, but we have never found it makes a difference. BUT if you have had the yeast for some time it might be an idea to add a little sugar and to wait to check if the yeast is still good.
For a crustier loaf place a small dish of water in the oven under the bread as it bakes.
Timings vary dramatically by age of the yeast, temperature, brand of flour, humidity and altitude. Go by the volume of the dough, not the time.
This recipe freezes very well – we slice and then toast from frozen. Once you are confident double the recipe and make two loaves.
Nutritional Information
This recipe is 5 Weight Watchers Smart Points per portion
• Please note that the nutrition information provided below is approximate and meant as a guideline only.
• Unless stated otherwise cup conversions have been made with an online tool. For accuracy please check with your favoured conversion tool. We recommend buying inexpensive digital kitchen scales.
Nutrition Facts
Easy Yogurt bread
Amount Per Serving
Calories 161Calories from Fat 9
% Daily Value*
Fat 1g2%
Saturated Fat 1g6%
Cholesterol 1mg0%
Sodium 241mg10%
Potassium 69mg2%
Carbohydrates 33g11%
Fiber 1g4%
Sugar 1g1%
Protein 5g10%
Vitamin A 5IU0%
Calcium 25mg3%
Iron 2mg11%
* Percent Daily Values are based on a 2000 calorie diet.
Course: Baking, Bread
Cuisine: Baking, Bread
Keyword: Loaf, white loaf
Delicious Recipes Emailed To You!Get easy, tasty recipes for FREE when you subscribe! Click to Subscribe Now!!
Update notes – Recipe published May 2014. Updated with expanded method, step by step photos and hints & tips August 2020.
I made your recipe with delicious result last night. My crust was crustier (dish with water underneath the bread) and middle was lovely soft. thank you for sharing.
Yoghurt is so versatile – I had never thought to use it in bread baking though. What a great idea. I wonder whether this would work in the bread maker as I am absolutely terrible at baking bread by hand. It really is my nemesis!
What a fabulous looking loaf Helen. I’ve never put yogurt in a slicing loaf but have used it for flatbreads and my “scrolls” half scone half roll LOL:-) Will have to give this a go!
Helen, first of all I have to say your photography is amazing! Secondly, this recipe sounds fabulous! I’ve really got to work on my bread making, so I think I will give this a go sometime this week!
Sounds/looks really lovely, v interested in trying yogurt instead of oil, much healthier…. an no sugar. I usually use my bread making machine but use a recipe designed for it. I am a bit of a novice and want to try this, but how do I convert it to making in my bread machine please?
We have a recipe for yoghurt bread in our bread machine booklet. Our bread machine is from 1996! But it’s like new and works excellent. The recipe calls for a little more yoghurt than yours but it is possible to use yoghurt in a bread machine. I was just wondering if it’s ok to use Greek style yoghurt.
Just made this bread for the first time and it’s delicious. So easy to make and me and my partner have almost polished a loaf off, just with butter … Yummy! I would definitely recommend this recipe!
Made this loaf lots of times now, it’s easy and delicious. Keeps very well and makes lovely toast. My family don’t usually like home made bread but they live this. Thank you for this lovely recipe.
Thank you so much!!! I made this bread right now and my nephew loved it! Would it be possible to freeze the natural yogurt I have right now and use it to bake the bread next time? Or would the texture change?? This recipe was so easy to follow thank you so much!
Your yogurt bread recipe sounds easy to make. Can I use dairy free yogurt or is there something in the diary yogurt that is needed for your yogurt recipe?
I have never tried it with a non dairy yoghurt – I can see why it won’t work as it is a yeasted bread – but you might need to tweak the quantities to get the right consistency
Hi. This recipe looks good but I’m wondering about how much Yeast to use. My 7g package says it is equal to 2 and a fourth Teaspoons. I’m going to try it with the whole package of yeast. Thank you!
This blog is a participant in the Amazon Services LLC Associates Program, an affiliate advertising program designed to provide a means for sites to earn advertising fees by advertising and linking to amazon.com. All our thoughts and opinions are our own and we are not paid for or mandated to provide a positive review.


Urvashi
I’m loving your photography on this post. I’ve just had breakfast but I want this now! Beautifully simple recipe!
Helen
Thank you Urvashi! I am feeling good about my images at the moment, and it is good to get feedback.
Rosana McPhee Hot&Chilli Blog
I made your recipe with delicious result last night. My crust was crustier (dish with water underneath the bread) and middle was lovely soft. thank you for sharing.
Helen
I am so glad you tried it and enjoyed it Rosana.
Laura@howtocookgoodfood
I adore yoghurt so this is certainly a loaf I will be making. Always like to have more uses for it!
Helen
Thank you Laura. It was delicious. Perfect sandwich bread.
Antonia
Yoghurt is so versatile – I had never thought to use it in bread baking though. What a great idea. I wonder whether this would work in the bread maker as I am absolutely terrible at baking bread by hand. It really is my nemesis!
Sarah, Maison Cupcake
That looks wonderful – reminds me of milk roll but more substantial. Beautiful photo!
Helen
Thank you Sarah! We did enjoy it!
Katie Bryson
What a fabulous way to use yogurt in a recipe Helen, I’d love to try a slice! Lovely styling as ever :-)
Jacqueline
That’s a nice looking loaf Helen. I really must try yoghurt in bread.
Helen
Let me know how if goes Jac!
Camilla @FabFood4All
What a fabulous looking loaf Helen. I’ve never put yogurt in a slicing loaf but have used it for flatbreads and my “scrolls” half scone half roll LOL:-) Will have to give this a go!
Helen
I was very pleased with it Camilla. Milk loafs and buns slice beautifully, so yogurt seems the next natural step!
Made With Pink
Helen, first of all I have to say your photography is amazing! Secondly, this recipe sounds fabulous! I’ve really got to work on my bread making, so I think I will give this a go sometime this week!
Helen
Thank you Andrea. That means so much as your photos are so good!
marudhuskitchen
PERFECT LOAF………AND NICE PICTURE…REALLY
Chris at Thinly Spread
Goodness that looks tempting – I love the photo, all Spring light and ‘eat me, eat me’. Gorgeous.
Helen
Thank you Chris. The loaf did not last long.
Vanesther - Bangers & Mash
Never tried using yoghurt in bread before – got to try this.
Helen
It was delicious and led to a lovely fluffy and soft loaf.
Sharyn Haines
I love this bread – so perfect for sandwiches.
Helen
I’ve no idea what happened to the nutrition plugin there. Good spot. I’ve corrected it.
Mrs J
Sounds/looks really lovely, v interested in trying yogurt instead of oil, much healthier…. an no sugar. I usually use my bread making machine but use a recipe designed for it. I am a bit of a novice and want to try this, but how do I convert it to making in my bread machine please?
Helen
We very rarely use a bread machine so I cant really advise, try on the white bread cycle, but I’m sure it will need some adaptation,
Nena
We have a recipe for yoghurt bread in our bread machine booklet. Our bread machine is from 1996! But it’s like new and works excellent. The recipe calls for a little more yoghurt than yours but it is possible to use yoghurt in a bread machine. I was just wondering if it’s ok to use Greek style yoghurt.
Helen Best-Shaw
Greek style yoghurt would be fine, but if it is very thick I’d thin with a spoon of milk.
Jane Yaull
Just made this bread for the first time and it’s delicious. So easy to make and me and my partner have almost polished a loaf off, just with butter … Yummy! I would definitely recommend this recipe!
Helen
I am so pleased you like it.
Mimi
It was easy and tasted delicious!
Jennifer Flack
Made this loaf lots of times now, it’s easy and delicious. Keeps very well and makes lovely toast. My family don’t usually like home made bread but they live this. Thank you for this lovely recipe.
Helen
thank you Jennifer – I love this loaf – such a lovely soft crumb,
Sandra Gordon
The recipe says 1 lb loaf tin. Would it be ok to use a 2 lb loaf tin? Thank you
Helen
you could, but the loaf will be very flat!
Janet
Hello,
I don’t understand what you mean by 1 tsp x 7g sachet of yeast: a volume amount multiplying a weight amount doesn’t make sense to me.
Helen
Dear Janet – sorry about that – its the way the recipe is displayed – it is a tsp or a 7g sachet.
Auntiecorn
Thank you so much!!! I made this bread right now and my nephew loved it! Would it be possible to freeze the natural yogurt I have right now and use it to bake the bread next time? Or would the texture change?? This recipe was so easy to follow thank you so much!
Helen
I think that the easiest thing would be to double the recipe, make two loaves and slice and freeze the second loaf!
So pleased you liked it
Amanda
I made a loaf today, and wow! Nice crispy crust and so fluffy in the middle ? Only issue that I had was the dough was quite sticky, is that normal?
Helen Best-Shaw
it is quite sticky, you could probably add a little less liquid to make handling easier if you wanted.
Theresa M
Your yogurt bread recipe sounds easy to make. Can I use dairy free yogurt or is there something in the diary yogurt that is needed for your yogurt recipe?
Helen Best-Shaw
I have never tried it with a non dairy yoghurt – I can see why it won’t work as it is a yeasted bread – but you might need to tweak the quantities to get the right consistency
Rick
Bread was perfect as written, I let it rise overnight because of time, Great recipe , Thank You.
Mary
Hi. This recipe looks good but I’m wondering about how much Yeast to use. My 7g package says it is equal to 2 and a fourth Teaspoons. I’m going to try it with the whole package of yeast. Thank you!
Rick
Perfect bread, I have made this bread many times and it always turns out perfect, a lot of compliments, Thank You.
Rick
Make this bread most weeks , always turns out perfect , Love it.
Helen Best-Shaw
that is fantastic. so pleased you like it so much!