
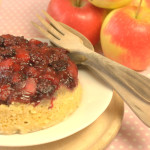
Get started with jelly making with our easy small batch blackberry and apple jelly recipe, which makes about 2 small jars. Quick, easy and so much more delicious when you make it yourself. Just three ingredients, and no added pectin.

Homemade preserves – jams, marmalade, jellies and chutneys are really so special, tasting far better than shop bought and if you forage or buy discounted fruit, much cheaper. Once I get into your groove preserving is hugely fun and addictive to make as well as being so easy. A gift of a few jars of homemade preserve is both welcome and thoughtful.
The only problem with preserve making is that it is SO addictive that unless you have a large family and eat preserves everyday you will be preserving than you eat and gift it.

8 years later and we have just about got though the stash above, so we are back to preserving with an vengeance. However to avoid the glut scenario we are focusing on small batch jams, jellies and other preserves. No more boiling up an entire cauldron or maslin pan and making a dozen jars – we now make 2 or 3 each time, 4 at the most.

There are massive advantages to small batch preserving
- you get to play with flavours
- you can experiment with setting points and consistencies
- if it goes wrong you haven’t wasted too many ingredients
- you don’t need any specialised equipment – you can use a regualr saucepan – no need to buy or store a preserving pan
- you don’t get bred of the same jam or jelly week in and week out
In autumn, all sorts of soft fruit in are season; blackberries, damsons, plums and so on. When possible, I do like making jam from fruit that I’ve picked or foraged myself, but if I haven’t had the opportunity then it doesn’t stop me anyway. One of my favourite jams, and very British indeed, is this small batch blackberry and apple jelly recipe. Traditionally, blackberries should be picked by Michaelmas (29th September), as that’s the day that the devil puts his foot on blackberries. Best avoided, I think, and the jam is so much better made with fresh, ripe fruit just of the bush and bursting with flavour.

Blackberry and apple is a classic combination for good reason: the pectin in Bramley cooking apples makes successful jam making much more likely, and making a jelly rather than a jam by straining out the seeds gives, I think, a more attractive, jewel-like, end product. No pips to stick in your teeth!
The process is straightforward. This recipe is based on two simple ratios, so it’s easy to adjust amounts to how much fruit you have. The first number to know is that the amount of water added at the start is 40% by weight of the fruit.
How to make Easy Blackberry and Apple Jelly
First, wash and cook the blackberries, apple and water together until soft,
Second, strain to extract the liquid. You can strain in a jelly bag (available for just a couple of pounds or dollars), or just a piece of muslin in a sieve, as I did. Leave it for as long as possible: at least an hour, or overnight if possible. Most importantly, don’t poke or squeeze the bag to extract more juice, as this will result in a cloudy jelly.

Third, measure the amount of liquid that you have, and calculate 75% of that volume. This number is the wight of sugar that to be added. For example, I added 190g of sugar to my 260ml of liquid. Add the sugar, and dissolve it in the fruit over a low heat.
Fourth, boil the jam rapidly so that it will set. There are various ways of testing to see if the jam has reached a setting point, but the great thing about small batch jam is that you quickly learn the ways of jam, what your favourite method is and gain a feel for how it looks as it approaches the setting point.
3 ways of testing jam setting points
- The temperature test. Really accurate electronic jam thermometers are readily availble, and not too expensive. They are much easier to read than traditional jam thermometers. Heat the jam to the setting point and once it’s there, you know it’s ready.
- The wrinkle test. Place a couple of sideplates in the freezer before you add the sugar. Once the jam is boiling, start testing by placing some on the plate. Allow it to cool; when you push your finger through, you’ll see it wrinkle up ahead of your finger. This technique takes a bit of practice.
- The flake test. Take a spoonful of jam from the pan and turn it vertically to tip out the jam. If the jam runs off, it hasn’t set. If, however a little remains on the spoon in a sort of wide drip that doesn’t fall, then the jam is ready. Again, this works best with some practice.
Fifth, allow to cool for a few minutes then transfer to jam jars that have been heated in the oven to about 100°/Gas mark 1. This sterilizes them, and also stops them cracking as you fill them with hot jam. Fill the jars using a jam funnel to avoid drips, and screw on the lid (also sterilized). it is a good idea to stand the jars in a roasting which will contain the mess should one crack. Both will be hot, so take care! As the jelly cools, the lid will pop to confirm that it’s sealed. When cold, pop into the cupboard when cool, or just start on the first pot straight away!
Waterbathing Jams and Jellies
I am based in the UK, here we do not routinely waterbath high sugar preserves such as jams and jellies, nor is there any official advice to do so.
I’ve been making jam this way for over 30 years, it is how my mother and grandmother made jam and we have never had a problem.
Please do your own research, follow the guidance in your own country, as best practice may vary according to where you are located.
Small Batch Blackberry and Apple Jelly Recipe – Ingredient Ratios
- Use about the same weight of blackberries to apples
- Cooking water is about 40% of the total weight of the fruit
- Sugar – 75% of the weight of the liquid

Small Batch Blackberry and Apple Jelly
Ingredients
- 220 g blackberries
- 220 g cooking apples (weight once peeled and chopped)
- 180 g water (40% of the weight of the fruit)
- 190 g sugar (depends on volume of jelly. 75% of the volume of liquid in grams of sugar)
Instructions
- In a good sized saucepan, gently simmer the fruit and water for about 10 – 15 minutes until soft.
- Strain through a jelly bag or muslin lined sieve for at least 1 hour, and prefrably overnight
- Heat enough jam jars and lids in a low oven: 135°C or gas mark 1.
- Measure the amount of liquid that you have. 75% of that volume is the weight of sugar to be added. Measure out and add the sugar.
- Gently heat to dissolve the sugar, then rapidly boil to setting point 105C – 10mins total. Test for setting with one of the techniques listed above.
- When setting point has been reached, take off the heat and allow to cool for a few minutes.
- Fill the hot jam jars using a jam funnel. Screw on the lids: take care, as everything is hot. Allow to cool.


Leigh Travers
Ooh this looks absolutely delicious and the perfect topping for autumn breakfasts! I’ll have to give this a go!
LaaLaa
I have never made my own jam / jelly before. Although I have a friend who loves doing this and baking her own bread. And it’s like they say there’s nothing better than homemade.
Helen
it is so satisfying to make your own!
Jenni
This looks so good, I love blackberry jam but I’ve never made it before. Gorgeous tea pot by the way
Helen
Thanks Jenni, small batch preserving is the perfect way to start!
Jenny
I always get put off as I don’t have room to store a huge batch of anything, really need to try making smaller batches.
Helen
Exactly! Smaller batches are perfect for anyone who like me is short on storage space!
Emma
Oh wow this looks so yummy! I’m trying to get into cooking/baking and I loveee jam so this sounds amazing!
Helen
small batch jams are an excellent place to start preserving from.
Olivia Jade
I’m not really a huge fan of jam personally but this has given me a great idea for some Christmas hampers! Great recipe :)
Helen
It would certainly make an excellent gift!
Tina | The Worktop
Delicious! I’ve been really into making small batch jam lately too. Thanks for all the helpful tips – I didn’t know that you shouldn’t poke or squeeze a muslin bag with blackberries to extract more juice. Interesting tidbit!
Helen
I can still remember my mother says – Don’t poke the jelly bag!
Lizzie
This looks like a perfect jar of autumn goodness! I love seeing your straining set up as my husband’s experiments with a jelly bag did not go well…
Helen
I actually could not find my jelly bag – I usually hang it from the legs of the upturned side table! The sieve is perfect for small quantities.
Angela
Sounds just perfect! The flavor of a homemade jam is just incredible and so fresh!
Helen
We far prefer home made here!
Felesha Bell
Blackberries are my absolute favorite! Love the addition of apple!!
Helen
The apple really lightens it up, and of course has the pectin to help it set!
Gloria @ Homemade & Yummy
Well just look at those crumpets. Hubby’s grandparents were from England, so he knows and loves these to bits. The jam sounds delicious…and I love the teapot and cups too!!
Helen
You cannot beat a hot buttered crumpet! Love my British teapot and mugs!
Kaz | Ickle Pickles Life and Travels
This looks so tasty – I have never tried making anything like this, you make it look so easy. Kaz
Helen
Preserving is really easy Kaz, and also very addictive once you get into it. My advice is to start slow with one or two jars at a time.
Nayna Kanabar
I make jam at home but never made jelly by straining the fruit. What do you do with the strained fruit?
Helen
I binned it as it is fairly dry and fully of pips.
Karen
Hi Helen, HELP! I’ve made this jelly at least ten times and it has been perfect but I cooked a batch this morning and think I’ve overcooked it as the usual rush of liquid followed by drips didn’t happen. It’s really just dripping. Should I just leave it to drip? Maybe pour boiling water over the fruit? There was 900g fruit but at the moment is looking like I’ll only get one jar rather than the 3/4 I was expecting!
Helen
let it all drip though then see how intense the flavour is. I’ve a feeling if you recook the pulp with more water the second straining will be far weaker, and also you might get a cloudy jelly. If the juice is very intense then add a little water to it.
M McA
I tried this recipe with only apple, before noticing the recipe for Small Batch Apple Jelly.
So far it looks like it will turn out well, and it was so simple to make!